Flutter Development (Day - 05)

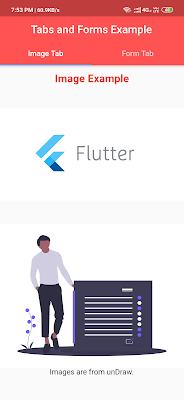
  • In this post we are going to talk about Tabs and Forms.
  • Here is the Sample code with Explanation in the form of comments (//).   
  • All source code : Click Here.


lib/main.dart:

import 'package:allaboutflutterblog/tuts/tabs_forms.dart';
import 'package:flutter/material.dart';

void main() {
  runApp(
    MaterialApp(
      home: TabsForms(),
      debugShowCheckedModeBanner: false, 
     
      theme: ThemeData(
        primaryColor: Colors.red,
        primarySwatch: Colors.blue,
      ),
    ),
  );
}


import 'package:flutter/material.dart';

class TabsForms extends StatefulWidget {
  @override
  _TabsFormsState createState() => _TabsFormsState();
}

class _TabsFormsState extends State<TabsForms> {
  GlobalKey<FormState> _formKey = GlobalKey<FormState>();
  TextEditingController _emailController = TextEditingController();
  TextEditingController _passwordController = TextEditingController();

  @override
  Widget build(BuildContext context) {
    return DefaultTabController(
      length: 2,
      initialIndex: 0,
      child: Scaffold(
        appBar: AppBar(
          centerTitle: true,
          title: Text("Tabs and Forms Example"),
          backgroundColor: Colors.redAccent,
          bottom: TabBar(
            tabs: <Widget>[
              Tab(
                child: Text("Image Tab"),
              ),
              Tab(
                child: Text("Form Tab"),
              ),
            ],
          ),
        ),
        body: TabBarView(
          children: <Widget>[

            ListView(
              children: <Widget>[
                Container(
                  alignment: Alignment.center,
                  padding: const EdgeInsets.only(top: 15.0),
                  child: Text(
                    "Image Example",
                    style: TextStyle(
                        fontSize: 20.0,
                        color: Colors.red,
                        fontWeight: FontWeight.bold),
                  ),
                ),
                Center(
                
                  child: Image.asset("images/img1.png"),
                ),
                Center(
                  child: Image.asset("images/img2.png"),
                ),
                Center(child: Text("Images are from unDraw."))
              ],
            ),
            Padding(
              padding: const EdgeInsets.all(15.0),
              child: Form(
                key: _formKey,
                child: Center(
                  child: Column(
                    mainAxisAlignment: MainAxisAlignment.center,
                    children: <Widget>[
                    
                      TextFormField(
                     
                        keyboardType: TextInputType.emailAddress,
                
                        validator: (val) {
                          if (val.isEmpty) {
                            return "Please provide Email";
                          }
                        },
                        controller: _emailController,
                       
                        onSaved: (val) {
                          _emailController.text = val;
                        },
                        autocorrect: true,
                        decoration: InputDecoration(
                          hintText: "Enter Your Email",
                          labelText: "Email",
                        ),
                      ),
                      TextFormField(
                        validator: (val) {
                          if (val.isEmpty) {
                            return "Please provide Password";
                          } else if (val.length < 6) {
                            return "Password must be greater than 6 characters";
                          }
                        },
                        obscureText: true,
                        controller: _passwordController,
                        onSaved: (val) {
                          _passwordController.text = val;
                        },
                        autocorrect: true,
                        decoration: InputDecoration(
                          hintText: "Enter Your Password",
                          labelText: "Password",
                        ),
                      ),
                      Padding(
                        padding: const EdgeInsets.only(bottom: 10.0, top: 10.0),
                      ),
                      MaterialButton(
                        color: Colors.redAccent,
                        child: Text(
                          "Submit",
                          style: TextStyle(color: Colors.white),
                        ),
                        onPressed: () {
                         
                          _validateForm();
                        },
                      ),
                    ],
                  ),
                ),
              ),
            ),
          ],
        ),
      ),
    );
  }

  void _validateForm() {
   
    if (_formKey.currentState.validate()) {
      _formKey.currentState.save();
      _formKey.currentState.reset();
    }
  }
}


Explanation:


  • theme: Showing the Themes we will talk themes in later part of the tutorial.
  • GlobalKey: Global key holds the state of the form which is used to controll when submitting the form by checking validation
  • TextEditionController: TextEditingController is used to control the text field.
  • DefaultTabController: Using DefaultTabController is the simplest option, since it creates a TabController and makes it available to all descendant widgets.
  • bottom: In Appbar use bottom and provide with the Tabs In the body section return the functionality of the tabs
  • TabBar: When a tab is selected, it needs to display content. You can create tabs using the TabBar widget.
  • TabBarView: Used to show the content for each tab.
  • ListView: ListView helps us to scroll.
  • ** Dont forget to add the image path in pubspec.yaml file.
  • TextFormField : The TextFormField widget renders a material design text field and can display validation errors when they occur.
  • keyboardType: TextInputType.emailAddress: input type should be email type.
  • Validator: checking whether the textfield is empty or invalid input field we will provide a warning.
  • Controller: When typing is completed we assign the text in the input field to val which is further checks for the validation.
  • obscureText: true: places dots instead of characters the lettes when we are typing
  • _formkey.currentState.validate(): checks the current state of the form and validate it then we save the form and clears when submit button is pressed.


Follow me on:
Twitter    Github     LinkedIn


Comments

Popular posts from this blog

Flutter Development (Day-16): All source code :  Click Here . Sorry for the last two days I haven't posted anything because I am ready to leave my hometown to attend my college.Is there anyone from AndhraPradesh or Tamilnadu .If yes please provide your city name in the comment section. In this post we are going to proceed the next level of our todo app.We are going add animations to our app,Code clean Up and some UI changes. We add the animation to our FloationgActionButton.You may ask why you haven't add animations to others as well? I tried it but it is looking weird. Adding animations to  FloationgActionButton is very much similar to our previous basic animation tutorial. From the next we are going to deal with some of the important widgets which we will be using in further tutorials. If you are following this tutorial / blog please leave your opinion 👀 / say Hii ✋/ Your e-mail in the comment section that I can improve myself and it will gives boost for me t...
Flutter Development (Day-00): This is the First Post from this Blog.This blog will tell you about Flutter.If you don't know about it then the upcoming posts will explain you everything.This is 30 day tutorial which explains about Flutter for absolute beginners. prerequsites:  If you are enthusiastic and Curious. All source code :  Click Here . If you are following this tutorial / blog please leave your opinion 👀 / say Hii ✋/ Your e-mail in the comment section that I can improve myself and it will gives boost for me to do more tutorials. If you have any doubts feel free to ask me in the comment section or email me ramubugudi4@gmail.com I can definetly give reply. Follow me on:   Twitter   Github     LinkedIn
Flutter Development (Day-13): In this post we are going to talk about basic animations in Flutter First we start the animation by creating two objects Animation animation, AnimationController animationController. Animation lets us deal with different types of animations like Tween. The tween is something in which you specify the input output range. Here begin is set to -1 and end is 0.0 which means the animation happens from out of the screen to the center of the screen. or rather, from the left most edge to the center of the app. We are also doing an ease in animation, so we specify the curve as fast out slow in. In the initState we provide the animation because the animation should occur when user launches the app.    void initState() {      super.initState();      animationController = AnimationController(        vsync: this,        duration: Duration(       ...